Short description
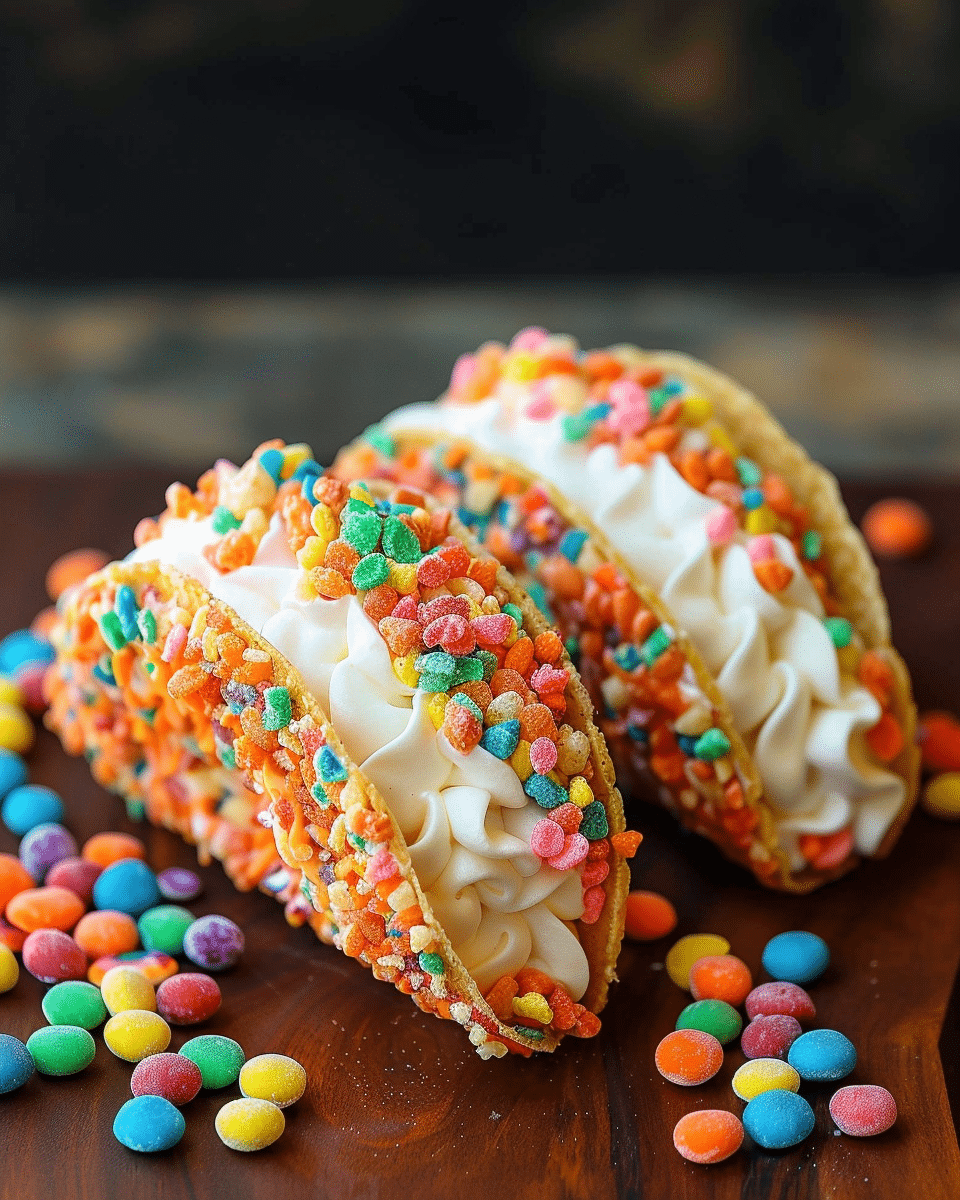
I’ve taken nostalgic Fruity Pebbles cereal and transformed it into a fun and colorful cheesecake taco. These vibrant handheld desserts feature a crunchy cereal shell filled with fluffy vanilla cheesecake—perfect for parties, after-school treats, or just satisfying a sweet craving.
Why You’ll Love This Recipe
I love how this recipe blends the playful colors and crunch of Fruity Pebbles with the creamy tang of cheesecake. The taco shape adds whimsy and portability, so they’re both eye-catching and easy to serve. Whether I’m making them for friends or indulging solo, these tacos always get rave reviews and brighten up the dessert table.
ingredients
(Her e’s a tip: Check out the full list of ingredients and measurements in the recipe card below.)
-
3 cups colorful Fruity Pebbles cereal
-
½ cup unsalted butter, melted
-
8 oz cream cheese, softened
-
½ cup powdered sugar, sifted
-
1 tsp pure vanilla extract
-
1 cup whipped cream
-
Additional Fruity Pebbles cereal for garnish
directions
-
Prepare the Crunchy Shell
-
In a large bowl, combine the Fruity Pebbles with the melted butter. I make sure each cereal piece is fully coated, which helps the shells bind together well without melting the colors.
-
-
Shape Your Shells
-
Firmly press the cereal mixture into taco-shaped molds or curved sections of a muffin tin using my fingers or the back of a spoon. I aim for a thickness of about ¼ inch. Then I chill them in the refrigerator for at least 30 minutes until they’re solid to the touch.
-
-
Whisk Up the Cheesecake Filling
-
Using an electric mixer, I beat the room‑temperature cream cheese for about 2 minutes until it’s smooth and fluffy. Then I slowly add the powdered sugar and vanilla extract, scraping down the bowl as needed so the mixture stays silky.
-
-
Add Airiness
-
I gently fold the whipped cream into the cream cheese base using a rubber spatula. I make sure to fold from bottom to top just until combined—this keeps the filling light and airy.
-
-
Assemble the Tacos
-
Once the shells are fully chilled and firm, I spoon or pipe the cheesecake filling into each shell, filling them generously so they slightly overflow.
-
-
Garnish and Serve
-
I top each taco with a few extra Fruity Pebbles, pressing them gently into the filling to help them stick. I serve them right away for maximum crunch, or refrigerate for up to 2 hours before enjoying.
-
Servings and timing
-
Makes 6–8 taco shells, depending on mold size
-
Prep time: ~15 minutes
-
Chill time: 30 minutes
-
Assembly time: ~10 minutes
-
Total time: ~55 minutes
(Note: Yield and times based on my experience building these in a home kitchen.)
Variations
-
Chocolate shell: Mix ½ cup melted chocolate chips into the cereal coating for a richer shell.
-
Fruit topping: Spoon fresh berries or fruit compote over the filling before serving.
-
Mini bites: Press cereal mix into mini cupcake liners for bite‑sized treats.
storage/reheating
I recommend storing assembled tacos in an airtight container in the refrigerator for up to 2 days. They don’t need reheating—just bring them out of the fridge 10 minutes before serving for the best texture. (Note that the shell will soften over time, so they’re at their crunchiest when fresh.)
FAQs
What’s the best way to shape the cereal shells?
I find using taco‑shaped molds or the curved tops of a muffin tin works really well. Press the mixture firmly and make them around ¼ inch thick so they hold their taco shape once chilled.
Can I make the shells ahead of time?
Yes! I’ve made the shells up to a day ahead—just store them in an airtight container at room temperature. Then fill them when I’m ready to serve.
Can I use low‑fat cream cheese or whipped cream?
You can, but I prefer full‑fat cream cheese and regular whipped cream for the creamiest, fluffiest filling. Lower‑fat versions may make the texture less rich.
How do I prevent the cheesecake filling from being too runny?
I make sure to fully sift the powdered sugar and whip the cream cheese until smooth. Also, I gently fold in the whipped cream so it stays light without becoming watery.
Can I freeze leftovers?
I don’t recommend freezing these, as the cereal shell can become soggy once thawed and the whipped cream filling may lose its texture. They’re best enjoyed fresh or refrigerated.
Conclusion
I love how these Fruity Pebbles Cheesecake Tacos offer nostalgia, flavor, and fun in every bite. They’re easy to make, customizable, and always make a statement at gatherings. Whether I’m craving something sweet or want to impress friends with a colorful twist, these tacos are my go‑to dessert. Enjoy making them!
Print
Fruity Pebbles Cheesecake Tacos
- Total Time: 55 minutes
- Yield: 6-8 taco shells
- Diet: Vegetarian
Description
Fruity Pebbles Cheesecake Tacos are a fun, colorful dessert with a crunchy cereal shell filled with creamy vanilla cheesecake. A nostalgic treat perfect for parties, after-school snacks, or any sweet craving.
Ingredients
3 cups colorful Fruity Pebbles cereal
½ cup unsalted butter, melted
8 oz cream cheese, softened
½ cup powdered sugar, sifted
1 tsp pure vanilla extract
1 cup whipped cream
Additional Fruity Pebbles cereal for garnish
Instructions
- In a large bowl, combine the Fruity Pebbles with the melted butter, ensuring each cereal piece is fully coated.
- Firmly press the cereal mixture into taco-shaped molds or a muffin tin, aiming for a ¼ inch thickness. Chill for at least 30 minutes until solid.
- Beat the cream cheese with an electric mixer for about 2 minutes until smooth and fluffy. Gradually add the powdered sugar and vanilla extract, scraping the bowl as needed.
- Gently fold the whipped cream into the cream cheese mixture until just combined, maintaining airiness.
- Spoon or pipe the cheesecake filling into the chilled taco shells, generously filling them so they slightly overflow.
- Top each taco with a few extra Fruity Pebbles, pressing gently into the filling to help them stick. Serve immediately or refrigerate for up to 2 hours before serving.
Notes
- For a chocolate shell, mix ½ cup melted chocolate chips into the cereal coating.
- Top with fresh berries or fruit compote for a fruity twist.
- Press cereal mix into mini cupcake liners for bite-sized treats.
- Store in an airtight container in the refrigerator for up to 2 days. They are best served fresh for maximum crunch.
- Prep Time: 15 minutes
- Cook Time: 0 minutes
- Category: Dessert
- Method: Chill and assemble
- Cuisine: American
Nutrition
- Serving Size: 1 taco
- Calories: 350
- Sugar: 25g
- Sodium: 150mg
- Fat: 22g
- Saturated Fat: 13g
- Unsaturated Fat: 6g
- Trans Fat: 0g
- Carbohydrates: 38g
- Fiber: 1g
- Protein: 3g
- Cholesterol: 50mg

