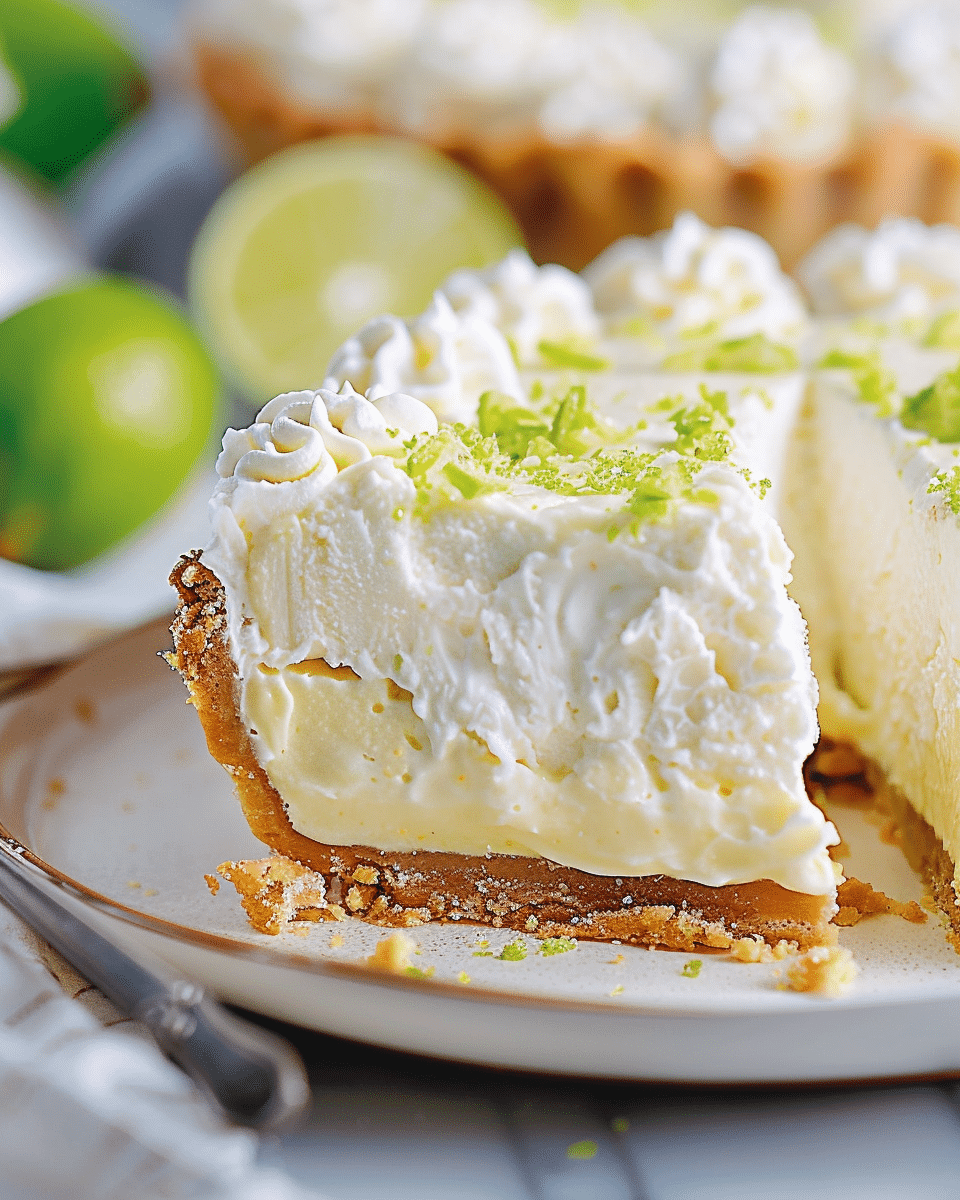
Key Lime Pie Lush is a no-bake, creamy dessert that’s perfect for summer gatherings or when you’re craving a sweet, tangy treat. With layers of Oreo crust, key lime-flavored cream cheese filling, and a fluffy whipped topping, this dessert is both indulgent and refreshing. It’s easy to make and always a hit at parties. The best part? It requires minimal effort but delivers maximum flavor!
Why You’ll Love This Recipe
I absolutely love making this Key Lime Pie Lush because it combines all the best elements of a classic key lime pie but in a way that’s even easier and more satisfying. The buttery Oreo crust complements the tangy key lime filling perfectly. It’s a layered dessert that brings together creamy textures and the tartness of lime, all topped with a cloud of whipped cream. Plus, it’s a no-bake dessert, which means I don’t have to worry about turning on the oven, making it a great option for warm weather or when I want to save time in the kitchen. It’s also incredibly customizable, so I can adjust the lime flavor or even try different crusts based on what I have on hand.
Ingredients
For the crust:
-
20 ounces double stuffed Golden Oreos family-sized package
-
⅓ cup unsalted butter, melted
For the filling:
-
16 ounces cream cheese, softened
-
6.8 ounces instant vanilla pudding mix (2) 3.4-ounce packages
-
5 1/2 cups heavy whipping cream, divided
-
1 cup key lime juice (fresh or bottled)
-
½ cup powdered sugar
-
Zest of 1 lime
(Hint: Check out the full list of ingredients and measurements in the recipe card below.)
Directions
-
Oreo Crust
I start by placing the Oreos into a food processor and pulse them until they form crumbs. I then reserve about 1 and ½ cups of the cookie crumbs and set them aside. I mix the remaining crumbs with the melted butter and press the mixture into the bottom of a 9×13 baking dish to form the crust. I set the dish aside while I work on the filling. -
Filling
In the body of a stand mixer with the paddle attachment, I add the softened cream cheese and mix until smooth, making sure there are no lumps. I then add the instant vanilla pudding mix and combine it with the cream cheese.
Next, I add 1 cup of heavy cream and mix on low speed until it’s fully combined. I continue by adding another cup of cream, mixing until incorporated. After that, I add the key lime juice and mix again until smooth.
I reserve ⅔ cup of this mixture for later and pour the remaining mixture over the prepared Oreo crust. I smooth it out with a spatula and sprinkle the reserved cookie crumbs evenly over the top. -
Whipped Cream
In the stand mixer, I add the remaining 3 and ½ cups of heavy cream and powdered sugar. Using the whisk attachment, I start on low speed, gradually increasing to medium speed to form medium peaks. I set aside about ⅓ of the whipped cream for decorating the top later.
I then fold the rest of the whipped cream into the ⅔ cup of reserved cream cheese mixture, along with the lime zest. I pour this lime-infused mixture over the cookie crumbs in the dish and smooth the top. -
Top and Set
Finally, I use the reserved whipped cream to top the dessert, either smoothing it over the top or piping it for a decorative effect. I place the dish in the fridge to set for at least 6 hours or overnight for the best results.
Servings and Timing
This recipe makes about 12 servings, depending on how large you cut the portions. It requires a minimum of 6 hours to chill in the refrigerator, though allowing it to set overnight gives the flavors even more time to meld together.
Variations
-
Crust Variation: While I love using Golden Oreos for the crust, I can easily switch things up by using regular Oreos, graham crackers, or even a gluten-free cookie option for a different texture and flavor.
-
More Lime Flavor: If I prefer a stronger lime taste, I can increase the amount of lime zest or add a bit more key lime juice.
-
Whipped Topping: For an extra touch, I might try adding a little more powdered sugar to the whipped cream or incorporating a hint of vanilla extract for a deeper flavor.
-
Toppings: Fresh lime slices or additional lime zest make for a beautiful, flavorful garnish. I can even try toasting coconut flakes and sprinkling them on top for a tropical twist.
Storage/Reheating
This Key Lime Pie Lush can be stored in an airtight container in the fridge for up to 3 days. I recommend not freezing it, as the texture may change once thawed. If I need to store leftovers, I make sure to cover the dish tightly to keep it fresh.
FAQs
How long does it take for Key Lime Pie Lush to set in the fridge?
I recommend allowing at least 6 hours for it to set, but overnight is best for the dessert to firm up and for the flavors to fully develop.
Can I make Key Lime Pie Lush ahead of time?
Absolutely! In fact, it’s perfect for making ahead of time. I like to prepare it a day or two before serving, so the layers have time to meld together.
Can I use a different type of pudding mix?
I’ve made this dessert with both vanilla and coconut pudding mixes, and it works well with either. However, vanilla is my favorite for the classic flavor combination.
Is there a substitute for heavy whipping cream?
If I don’t have heavy whipping cream, I can use a combination of half-and-half and a bit of butter to get a similar richness, though the texture might not be quite as fluffy.
Can I freeze Key Lime Pie Lush?
While it’s best enjoyed fresh from the fridge, I can freeze the dessert if necessary. I’d recommend freezing it without the whipped topping and adding that after thawing. Be sure to wrap it tightly in plastic wrap before freezing.
Conclusion
Key Lime Pie Lush is the perfect dessert when I want something that’s both easy to prepare and packed with flavor. It’s refreshing, creamy, and just the right amount of tart. Whether I’m serving it for a special occasion or just craving a delicious treat, this dessert never disappoints. The no-bake aspect and versatility of the recipe make it a go-to for warm weather and gatherings. I’m always excited when I get to serve this crowd-pleaser!
Print
Key Lime Pie Lush
- Total Time: 6 hours (minimum) to set
- Yield: 12 servings
- Diet: Vegetarian
Description
Key Lime Pie Lush is a no-bake, creamy dessert with layers of Oreo crust, tangy key lime cream cheese filling, and fluffy whipped topping. It’s a refreshing treat that’s perfect for summer gatherings and easy to make.
Ingredients
20 ounces double stuffed Golden Oreos family-sized package
⅓ cup unsalted butter, melted
16 ounces cream cheese, softened
6.8 ounces instant vanilla pudding mix (2) 3.4-ounce packages
5 1/2 cups heavy whipping cream, divided
1 cup key lime juice (fresh or bottled)
½ cup powdered sugar
Zest of 1 lime
Instructions
- Place the Oreos into a food processor and pulse them into crumbs. Reserve 1 and ½ cups of crumbs and set aside. Mix the remaining crumbs with the melted butter, then press into the bottom of a 9×13 baking dish to form the crust. Set aside.
- In a stand mixer, mix the softened cream cheese until smooth. Add the instant vanilla pudding mix and combine.
- Add 1 cup of heavy cream to the mixture and mix on low speed until fully incorporated. Add another cup of cream and mix until smooth. Then, add the key lime juice and mix again.
- Reserve ⅔ cup of the mixture and pour the remaining mixture over the prepared crust. Smooth it out with a spatula and sprinkle the reserved cookie crumbs over the top.
- In the stand mixer, add the remaining 3 ½ cups of heavy cream and powdered sugar. Whisk on low to medium speed until medium peaks form. Set aside about ⅓ of the whipped cream for decorating the top.
- Fold the remaining whipped cream into the reserved ⅔ cup of cream cheese mixture along with the lime zest. Pour the lime-infused mixture over the cookie crumbs in the dish and smooth the top.
- Top with the reserved whipped cream, smoothing it over or piping it for decoration. Refrigerate for at least 6 hours, or overnight for best results.
Notes
- Can be made ahead of time and refrigerated for up to 3 days.
- For a stronger lime flavor, increase the lime zest or key lime juice.
- Can be stored in an airtight container for up to 3 days. It’s not recommended to freeze.
- Consider adding fresh lime slices or toasted coconut flakes as a garnish.
- If you don’t have heavy whipping cream, substitute with half-and-half and a bit of butter for a similar richness.
- Prep Time: 30 minutes
- Cook Time: None
- Category: Dessert
- Method: No-Bake
- Cuisine: American
Nutrition
- Serving Size: 1 slice
- Calories: 390
- Sugar: 28g
- Sodium: 160mg
- Fat: 28g
- Saturated Fat: 16g
- Unsaturated Fat: 8g
- Trans Fat: 0g
- Carbohydrates: 37g
- Fiber: 1g
- Protein: 3g
- Cholesterol: 80mg

