If you’re a fan of Starbucks’ famous cake pops, you’ll love this homemade version that’s easy to recreate in your own kitchen. With a soft, moist cake center and a sweet candy coating, these cake pops are perfect for any occasion, whether it’s a birthday, a special treat, or just a fun snack to share. Follow these simple steps, and you’ll have your own batch of delicious Starbucks-inspired cake pops ready to enjoy.
Why You’ll Love This Recipe
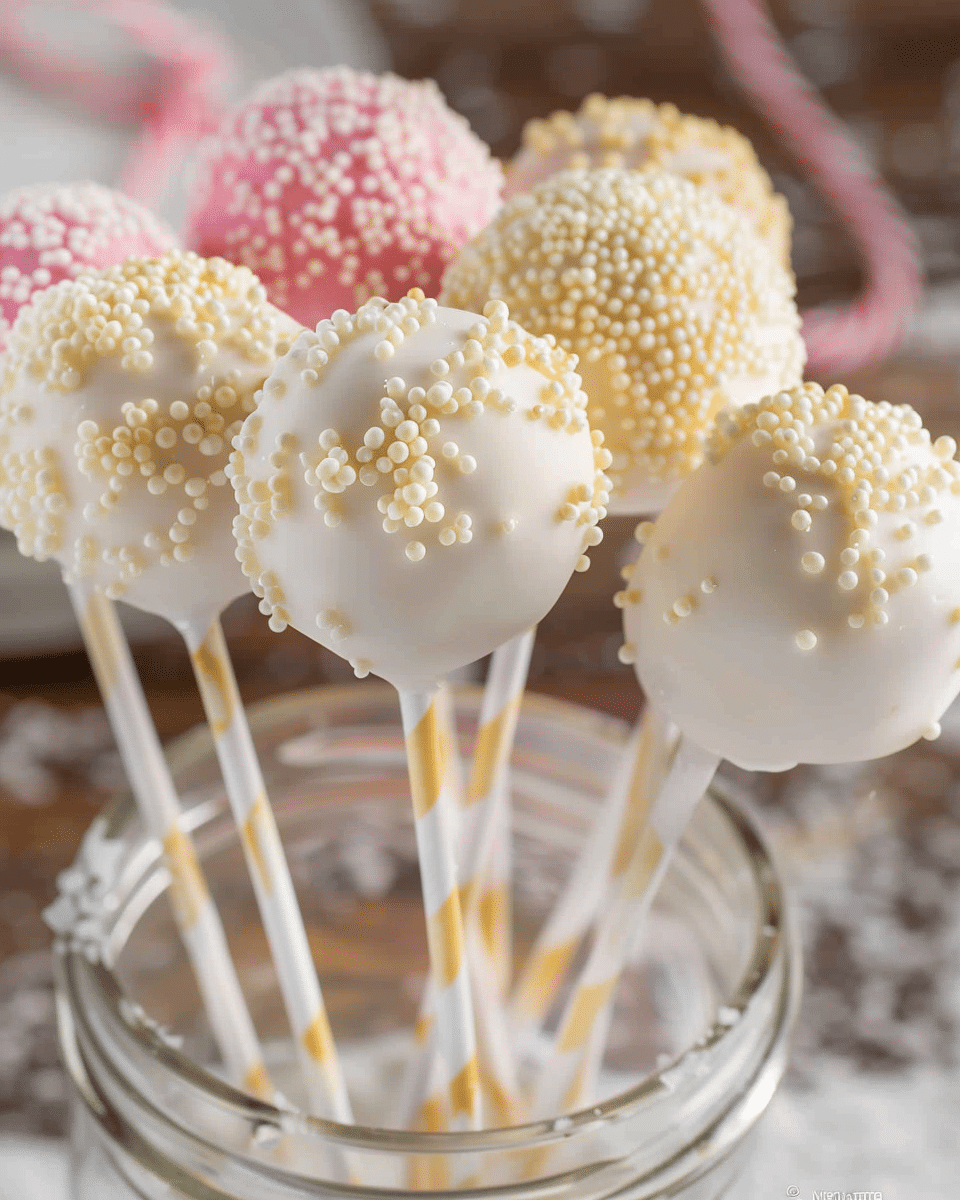
I love this recipe because it brings that Starbucks flavor to my home kitchen, and it’s so much fun to make! The combination of a soft vanilla cake, creamy frosting, and the sweet, pink candy melt coating creates a deliciously balanced treat. Plus, they’re bite-sized, making them perfect for parties or a sweet snack any time. Not to mention, decorating them with sprinkles makes them as cute as they are tasty. I can easily customize them for different occasions by changing the sprinkles or candy coating color. What’s not to love?
Ingredients
-
Classic Vanilla Cake Mix – Plus the ingredients called for on box to make the cake
-
Vanilla Frosting – I used the pre-made frosting
-
Cake Pop Sticks or Lollipop Sticks
-
Pink Candy Melts
-
White Sprinkles
(Here’s a tip: Check out the full list of ingredients and measurements in the recipe card below.)
Directions
-
I start by preparing the cake mixture in a large bowl, following the instructions on the cake mix box. Then, I bake it in the oven and let it cool to room temperature.
-
Once the cake is cool, I remove it from the pan and discard the brown outside layer of the cake.
-
I crumble up the remaining cake into small pieces and add them to a large mixing bowl.
-
Next, I mix in the vanilla frosting with the crumbled cake until it’s well combined.
-
Using a cookie scoop, I shape the cake mixture into 24-36 cake balls, depending on the size I want, and place them on a lined baking sheet.
-
I microwave the pink candy melts in a small bowl for 30 seconds, stir, and then continue to heat them in 30-second intervals until they are fully melted.
-
I dip each cake pop stick into the melted candy and insert it halfway into the cake balls. Then, I place the cake pops in the freezer for 10-15 minutes to help them set.
-
After the cake pops have chilled, I dip each one into the melted candy melts, ensuring it’s completely covered. I let any excess candy drip off back into the bowl.
-
I place the cake pops on a block of Styrofoam or a cardboard box to hold them while the candy coating dries and solidifies. I make sure to add the sprinkles before the candy coating dries.
-
Once the candy coating has fully dried, I have a batch of beautiful and tasty cake pops ready to serve and enjoy!
Servings and Timing
This recipe yields about 24-36 cake pops, depending on the size of the balls you make. The total preparation time takes around 1.5 to 2 hours, including baking, cooling, and chilling time.
Variations
-
Flavor Options: You can swap the vanilla cake mix for chocolate, red velvet, or any other flavor of your choice to mix things up.
-
Coating Colors: While I love the pink candy melts, feel free to get creative with different colors, like blue for a baby shower or red for Valentine’s Day.
-
Toppings: Change up the sprinkles! Use colorful nonpareils, mini chocolate chips, or even drizzle extra melted chocolate on top for a fun twist.
Storage/Reheating
Once the cake pops are fully set and dry, I store them in an airtight container at room temperature for up to 5 days. If you want to keep them longer, they can be stored in the fridge for up to a week. To bring them back to room temperature, I just let them sit out for 15-20 minutes before serving. Reheating isn’t necessary since they are best enjoyed as they are, at room temperature.
FAQs
Can I use homemade cake instead of cake mix?
Yes, you can definitely use a homemade cake recipe if you prefer. Just make sure to let it cool completely before crumbling it up and mixing with frosting.
How do I keep the cake pops from falling off the sticks?
Make sure to dip the sticks in the melted candy before inserting them into the cake balls. This will help the stick stay in place as the candy sets.
Can I make these cake pops in advance?
Yes, you can prepare them a day or two ahead of time. Just make sure to store them in an airtight container to keep them fresh.
How can I make the cake pops more festive for special occasions?
You can change the color of the candy melts, use themed sprinkles, or even add edible glitter to make them more festive. They’re highly customizable for any event!
Can I freeze the cake pops?
Yes, you can freeze the cake pops before or after dipping them in the candy coating. Just wrap them in plastic wrap and place them in a freezer-safe container. Let them thaw at room temperature before serving.
Conclusion
Making these homemade Starbucks cake pops is an easy and fun way to enjoy a treat that’s both delicious and visually appealing. Whether you’re craving something sweet for yourself or need a cute dessert for a party, this recipe is sure to impress. I love how customizable it is, and it’s a great way to put a personal touch on a popular treat. The best part? You don’t need a bakery to enjoy a Starbucks-inspired cake pop!
Print
Starbucks Cake Pops Recipe
- Total Time: 1.5-2 hours
- Yield: 24-36 cake pops
- Diet: Vegetarian
Description
Homemade Starbucks-inspired cake pops with a soft, moist vanilla cake center and a sweet candy coating, perfect for any occasion.
Ingredients
Classic Vanilla Cake Mix – Plus the ingredients called for on box to make the cake
Vanilla Frosting – Pre-made frosting
Cake Pop Sticks or Lollipop Sticks
Pink Candy Melts
White Sprinkles
Instructions
- Prepare the cake mixture in a large bowl, following the instructions on the cake mix box. Bake and let it cool to room temperature.
- Remove the cake from the pan and discard the brown outside layer.
- Crumble the remaining cake into small pieces and add to a large mixing bowl.
- Mix in the vanilla frosting with the crumbled cake until well combined.
- Use a cookie scoop to shape the cake mixture into 24-36 cake balls and place them on a lined baking sheet.
- Microwave the pink candy melts in a small bowl for 30 seconds, stir, then heat in 30-second intervals until fully melted.
- Dip each cake pop stick into the melted candy and insert halfway into the cake balls. Freeze for 10-15 minutes to set.
- Dip each cake pop into the melted candy melts, ensuring it’s completely covered. Let excess candy drip off.
- Place the cake pops on a block of Styrofoam or a cardboard box to hold them while the coating dries. Add sprinkles before the candy coating dries.
- Once the candy coating has dried, serve and enjoy the cake pops.
Notes
- For variations, you can swap the vanilla cake mix for other flavors like chocolate or red velvet.
- Customize the candy coating color for different occasions.
- Change up the sprinkles with options like nonpareils, mini chocolate chips, or drizzled melted chocolate.
- Store the cake pops in an airtight container at room temperature for up to 5 days. For longer storage, keep them in the fridge for up to a week.
- Freezing is an option; wrap them in plastic wrap and place in a freezer-safe container.
- Prep Time: 30 minutes
- Cook Time: 30 minutes
- Category: Dessert
- Method: Baking, Freezing, Dipping
- Cuisine: American
Nutrition
- Serving Size: 1 cake pop
- Calories: 160
- Sugar: 15g
- Sodium: 50mg
- Fat: 8g
- Saturated Fat: 5g
- Unsaturated Fat: 2g
- Trans Fat: 0g
- Carbohydrates: 21g
- Fiber: 0g
- Protein: 1g
- Cholesterol: 20mg

